
I have been saving random tissue paper for a while now. If it’s totally wrinkled, I typically trash it, but I am a big believer in letting little go to waste (a product of my upbringing – thanks Mom & Dad!).
My stash included tissue paper from Vineyard Vines, and it was so cute that I couldn’t bear to toss it, but realistically, it was quite wrinkled and not really appropriate for re-use. Until now.
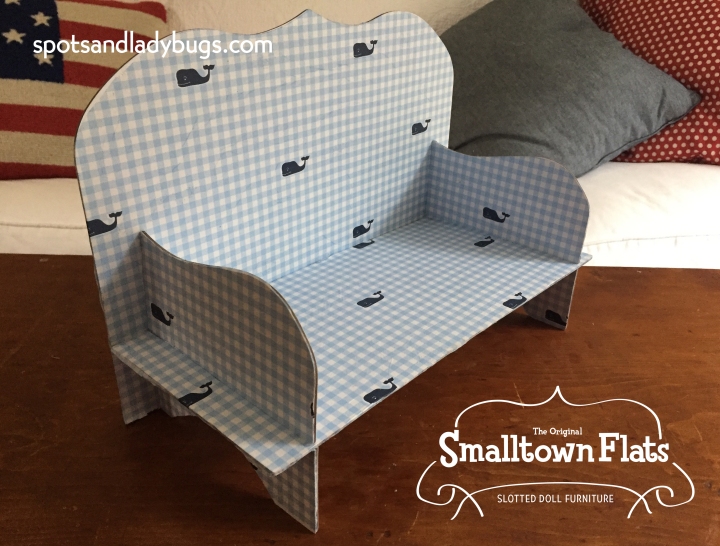
This technique was really quite easy – all I needed was a pencil for tracing the pattern, scissors, a paint brush, white glue and water (in addition to the tissue paper and Smalltown Flats Cozy Couch).


First, lay the furniture piece on the tissue paper, trace around the outside, and cut it out. It is better to cut too much around the margin, as you can always trim the edges or wrap them over the edge once it all dries. Note: Don’t worry about tracing/cutting into the slots – that will be fixed at the end.
Second, using some white glue (you can thin it with a little bit of water so it doesn’t dry out so quickly), paint the glue mixture onto the furniture piece, and lay the cut out tissue on top. There will probably be wrinkles, and some will smooth out, but others will not. It’s not a perfect science, but I think it looks more like fabric with a few wrinkles, anyway!

I then brushed another coat of the glue mixture over the top of the piece, using the paintbrush to smooth out the largest wrinkles, though use caution so as to not tear the paper. This tissue paper was actually quite hearty, so it didn’t tear at all.

If you want your patterns to match up, place them on the tissue paper so that they will be cut out in the same vertical or horizontal lines. This was easy to do with the grid pattern and the whales guiding me, but also because of the symmetry of the paper, I thought it would look better.
After tracing and covering all of the pieces and letting them dry, I used my scissors to cut into the slots so that they were usable again. I also trimmed off some pieces that were hanging over the edge.
If you want to cover both sides of the furniture, when one side of the furniture is dry, repeat the process of tracing and gluing the other.
When I was sure they were dry, I assembled the pieces. Well, actually, I was so excited to put them together that I didn’t wait. And they semi-glued themselves together and I had to carefully pull them apart. I have a dominant impatience gene, apparently. But if you’re not me, do it the right way and wait a bit!!!
As you can see, the end result was pretty darn cute, huh? And sooooo easy!
Happy crafting!!!
